


Wondering why your website is loading slowly?
Worried that your website speed may impact SEO?
Hoping to boost your current SERP rankings?
If you’re here, there’s a good chance you’re hoping to learn how to speed up your website.
And we have good news: Making your website load faster not only benefits your users but can also help you get more organic traffic from Google.
You can help boost your website’s visibility in search by:
- Using a website speed test tool that monitors your website speed in real time.
- Making high-impact changes.
So, let’s take a look at how you can check if your website performance is good enough to impress Google, plus what you can do to make it faster.
Why Does Site Speed Matter For SEO?
In 2021, Google rolled out the page experience update, which confirmed a key piece of SEO information – website speed is a ranking factor.
That means Google’s search engine prefers websites that load quickly and smoothly for your visitors.
There’s a larger chance that Google will display faster websites before slower websites on search engine results pages (SERPs).
What Factors Does Google Look At For Website Speed?
There are so many factors that affect website speed, but Google has made it easy for you to uncover.
Prior to the page experience algorithm update, Google created a set of three metrics called Core Web Vitals, and it uses those metrics to determine your website’s speed and usability.
These three key metrics can help you navigate what pages and parts of your website are affecting site speed and user experience – this makes it easy to pinpoint what is causing your website to rank lower.
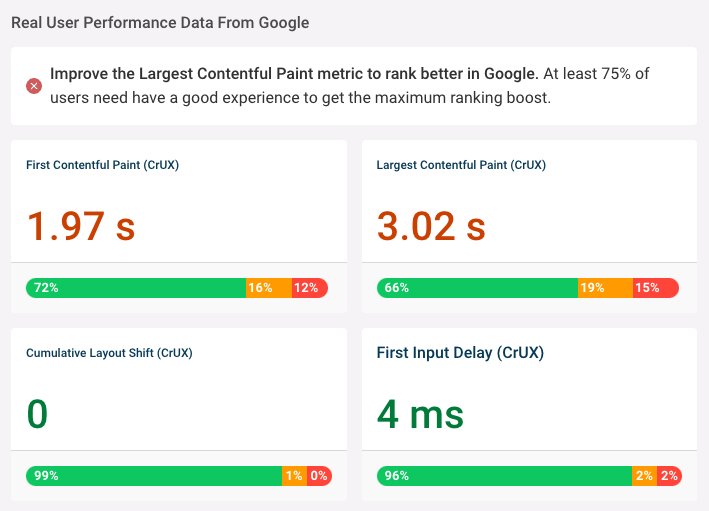 Screenshot showing Core Web Vitals data in DebugBear, October 2022
Google’s Core Web Vitals
In order to make sure your website ranks well, you’ll need to make sure you’re paying attention to:
- Largest Contentful Paint (LCP): How quickly does content render?
- First Input Delay (FID): How quickly does the page respond to user interaction?
- Cumulative Layout Shift (CLS): Is the page layout stable or does content shift around after load?
When you input your website into Google Search Console or a Core Web Vitals monitoring tool, you will get a score and pages affected, along with a green, yellow, or red notation.
If your website has any red or yellow markers, it’s time to use a website speed test tool to uncover what you should fix on your site.
What Tools Can You Use To Test Site Speed?
Dedicated site speed testing tools can provide a lot of high-quality data and recommendations on how to improve your site speed.
These types of tools are created specifically for speed tests and can provide you with every piece of information you need to increase the load times of your site.
Try these dedicated website speed test tools:
We’ll use the free DebugBear testing tool in this article, but you can also use an alternative like WebPageTest or GTmetrix.
In addition to the tools above, there are also insight tools that can help you understand local site speed and lab test site speed.
Testing Site Speed Locally On Your Computer
Chrome DevTools can provide a lot of in-depth data on how your website loads.
However, testing on your own computer makes the test result depend heavily on your local environment. It can also be difficult to manually clear all relevant caches to match the experience of a first-time user.
Google’s Site Speed Tool
PageSpeed Insights is great to get a quick overview of your site speed.
You get both real user data and suggestions on how to speed up your website based on a lab test. However, because it uses simulated throttling, the lab data isn’t always accurate.
Test Your Site For Free With DebugBear, Now →
How To Test A Website With DebugBear
Testing your site speed with DebugBear only takes seconds.
To run a web performance test:
- Visit: Go to debugbear.com/test.
- Test: Enter the URL of your website.
- Review: View your results; see metrics and in-depth debug data that you can use to understand the metrics and make changes.
Let’s dive into some of the metrics and learn how to speed up your site.
Aim For A Score Of 75%+ To Get Max SERP Rankings
One key metric that DebugBear’s Website Speed Test gives you is the “Real User Score”.
This percentage helps you understand how well your website is performing in the real world – with real users.
Based on data Google collects from real Chrome users, this number shows what percentage of users had a good experience on your website – this data is what’s used as a ranking signal.
Aim for a score of at least 75% to get the maximum ranking boost.
75% of visitors need to have a good Core Web Vitals experience to get the maximum ranking boost from Google.
See Your Site Load Through Your Visitor’s Eyes
Get a good idea of what your visitors are actually experiencing when they visit your website.
Notice anything loading slowly or out of place? This can help you identify important lags and conversion issues that your visitors experience.
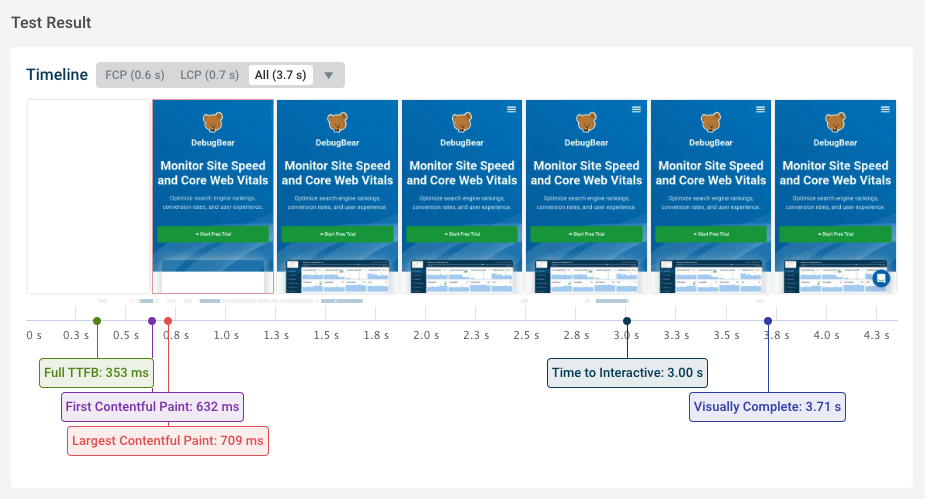
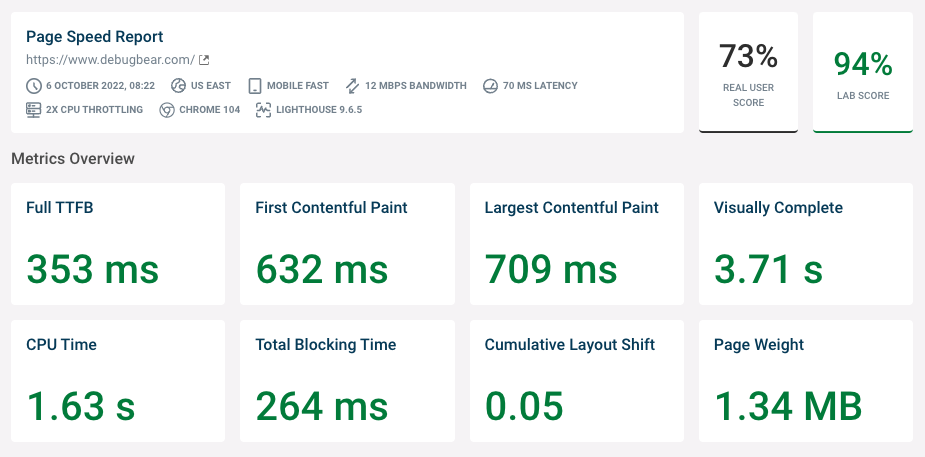 Screenshot showing the result of a DebugBear web performance test, October 2022
The timeline filmstrip shows the rendering progress of the website over time.
For example, this page starts to render after 0.7 seconds, and the main image renders after 1.3 seconds.
The website is fully rendered, also known as Visually Complete, when the chat widget is displayed after 3.7 seconds.
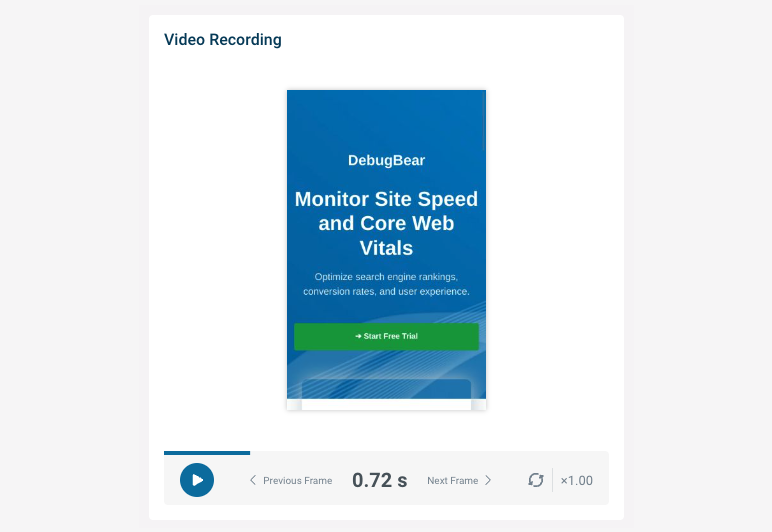
 Screenshot of DebugBear showing the rendering progress of a website over time, October 2022
Within the tool, you can also watch a video recording of the rendering process.
This is a great way to demonstrate the impact of performance issues to clients or other members of your team.
 Screenshot showing a video recording of a partially rendered website in DebugBear, October 2022
Test Site Speed Changes By Seeing Your True Loading Stats
Let’s say you’ve been optimizing your website, and you want to understand if those changes will make an impact.
This tool runs a “lab test” in an optimal environment to discover if you’re optimizing your site correctly.
When you test your site, you’ll get an official “Lab Score”, which is a summary of six performance metrics that come from the Performance score from Google’s Lighthouse tool:
- First Contentful Paint (10% of the overall score).
- Speed Index (10%).
- Largest Contentful Paint (25%).
- Time to Interactive (10%).
- Total Blocking Time (30%).
- Cumulative Layout Shift (15%).
Using this data, you’ll uncover how helpful your last round of optimizations was and what you may need to change.
By now, you’re probably wondering what you need to change. Let’s learn how to optimize your site using each key metric of the Metrics Overview.
How To Optimize Website Speed
Running a speed test is the first part of your website optimization journey.
Once you have your metrics, you’ll need to know how to interpret them and what to do to fix them.
In the Metrics Overview area of your website speed report, you’ll see the key metrics we’ll focus on to help speed up your site:
- First Contentful Paint: This can be sped up by repairing server communication speed.
- Largest Contentful Paint: This can be sped up by optimizing media and resources.
Additionally, you can use the request waterfall to see how long requests take and how that impacts those metrics.
How To Speed Up First Contentful Paint (FCP)
Let’s start by making your website show up sooner for your visitors; we’ll tackle First Contentful Paint, first.
What Is First Contentful Paint?
First Contentful Paint measures how soon a page’s content first starts to appear after your visitor navigates to that page.
It’s important that your key content shows up quickly in order to keep your visitor from leaving your website. The faster a user leaves your website, the faster Google learns that the page experience may be bad.
But how do you know exactly what’s causing your website to load slowly?
How do you uncover which server issues are slowing down your website? Let’s find out.
Why Is My First Contentful Paint Taking So Long?
Your FCP may be impacted by server connection speed, server requests, render-blocking resources, and more.
It sounds like a lot, but there’s an easy way to see exactly what’s slowing down your FCP – the request waterfall.
This useful tool shows what requests are made by your website and when each request starts and finishes.
For example, in this screenshot, we first see a request for the HTML document and then two requests to load stylesheets that are referenced in the document.
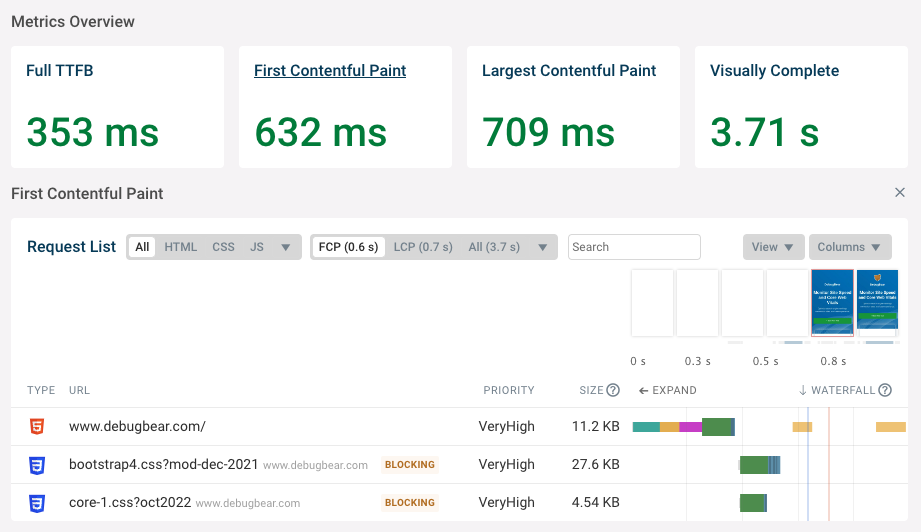 Screenshot showing debug data for the First Contentful Paint metric in DebugBear, October 2022
Why does the First Contentful Paint happen after 0.6 seconds? We can break down what’s happening on the page to understand this.
Understanding What Happens Before A First Contentful Paint
Before the first pieces of content can load on your webpage, your user’s browser has to first connect to your server and retrieve the content.
If this process takes a long time, then it takes a long time for your user to see your website.
Your goal is to learn what’s going on before your website begins to load so you can pinpoint issues and speed up the experience.
Page Load Part 1: The Browser Creates A Server Connection
Before first requesting a website from a server, your visitor’s browser needs to establish a network connection to that server.
This typically takes three steps:
- Checking DNS records to look up the IP address of the server based on the domain name.
- Establishing a reliable server connection (known as a TCP connection).
- Establishing a secure server connection (known as an SSL connection).
These three steps are performed by the browser, one after the other. Each step requires a round trip from your visitor’s browser to your website’s server.
In this case, it takes around 251 milliseconds to establish the server connection.
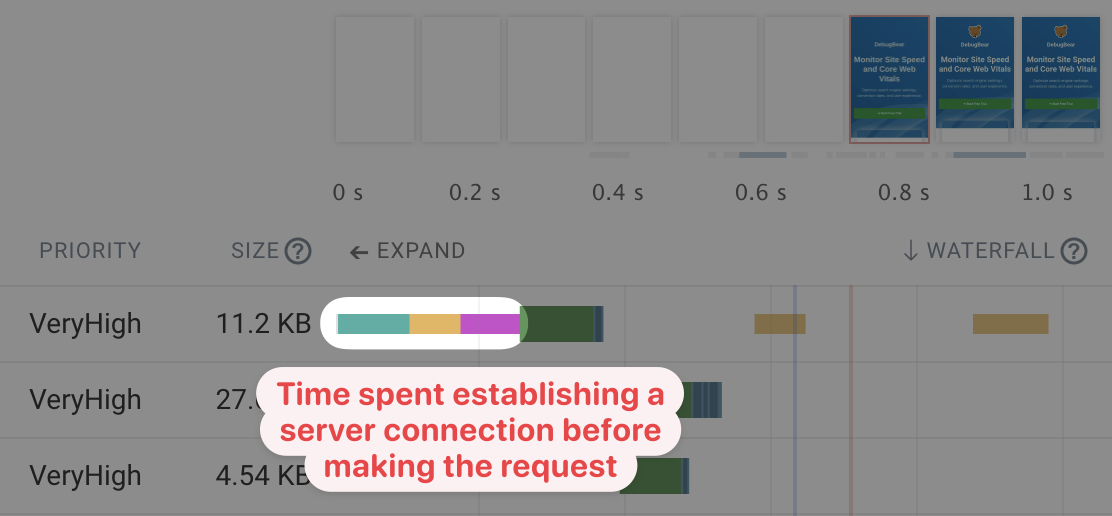 DebugBear screenshot showing the network round trips used to establish a server connection, October 2022
Page Load Part 2: The Browser Requests The HTML Document (Time To First Byte Happens Here)
Once the server connection is established, your visitor’s browser can request the HTML code that contains the content of your website. This is called an HTTP request.
In this case, the HTTP request takes 102 milliseconds. This duration includes both time spent on the network round trip and the time spent waiting for the server to generate a response.
After 251 milliseconds to create the connection and 102 milliseconds to make the HTTP request, your visitor’s browser can finally start downloading the HTML response.
This milestone is called the Time to First Byte (TTFB). In this case, that happens after a total of 353 milliseconds.
After the server response is ready, your visitor’s browser spends some additional time downloading the HTML code. In this case, the response is fairly small and the download only takes an additional 10 milliseconds.
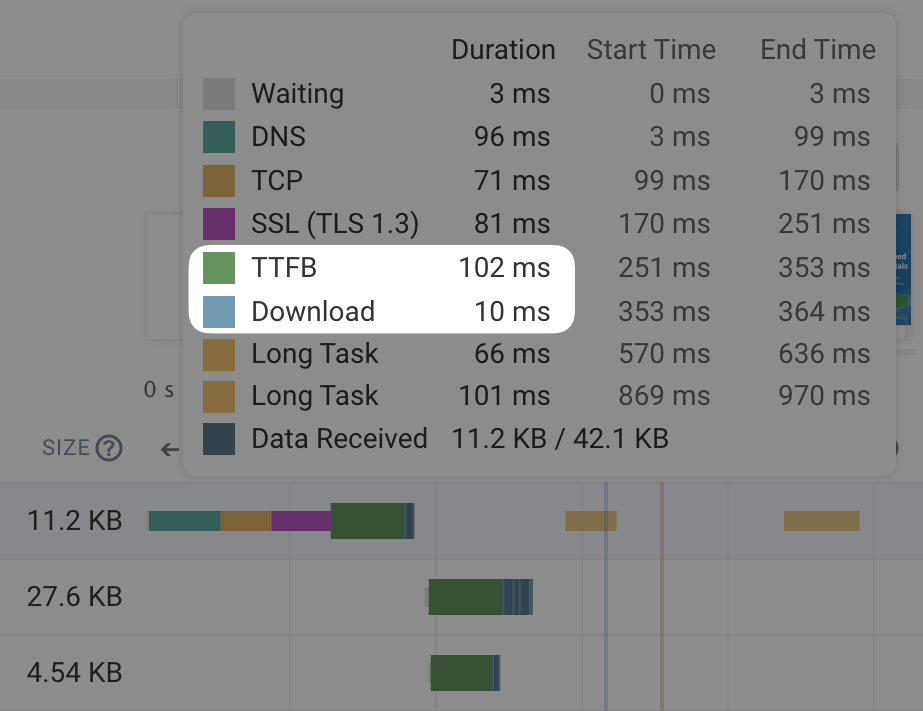 DebugBear screenshot showing the different components of an HTTP request, October 2022
Page Load Part 3: Your Website Loads Additional Render-Blocking Resources
Browsers don’t render, or show, pages immediately after loading the document. Instead, there usually are additional render-blocking resources.
Most pages would look bad without any visual styling, so CSS stylesheets are loaded before a page starts rendering.
Loading the 2 additional stylesheets in this website speed test example takes 137 milliseconds.
Note that these requests don’t require a new server connection. The CSS files are loaded from the same domain as before and can re-use the existing connection.
 DebugBear screenshot showing additional render-blocking resources being loaded after the HTML document, October 2022
Page Load Part 4: The Browser Renders The Page
Finally, once all the necessary resources have been loaded, your visitor’s browser can start rendering the page. However, doing this work also takes some amount of processing time – in this case, 66 milliseconds. This is indicated by the orange CPU task marker in the waterfall view.
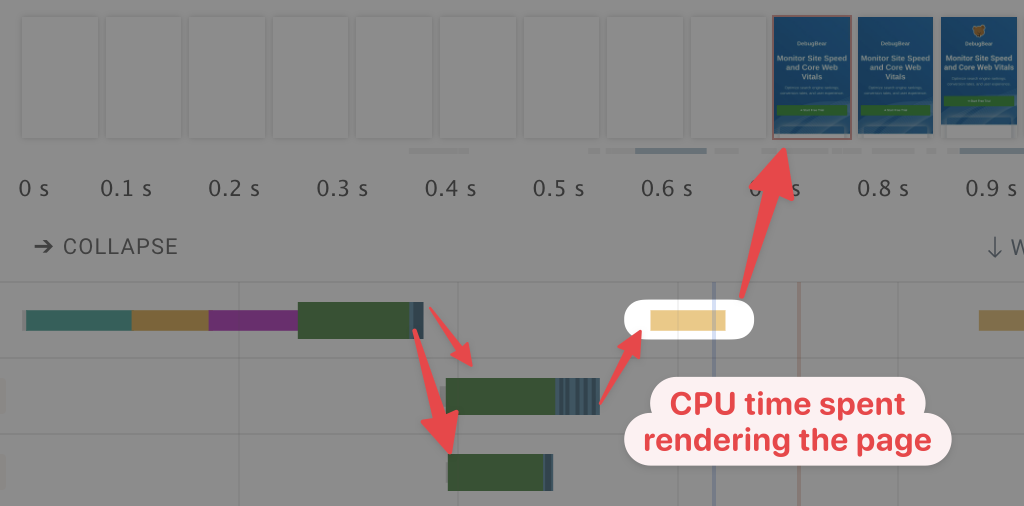 DebugBear screenshot showing the steps leading from loading the HTML document to rendering the web page, October 2022
We now understand why the FCP happens after 632 milliseconds:
- 364 milliseconds for the HTML Document request.
- 137 milliseconds to load the stylesheets.
- 66 milliseconds to render the page.
- 65 milliseconds for other processing work.
The other processing work includes small jobs like running inline scripts or parsing the HTML and CSS code once it’s downloaded. You can see this activity as small gray lines just under the rendering filmstrip.
How To Optimize First Contentful Paint (FCP)
Now that you understand what leads up to your website being rendered, you can think about how to optimize it.
- Can the server respond to the HTML request more quickly?
- Can resources be loaded over the same connection instead of creating a new one?
- Are there requests that can be removed or changed to no longer block rendering?
Now that the beginning pieces of your website are loading sooner, it’s time to focus on making the full site load faster.
How Speed Up Largest Contentful Paint (LCP) With DebugBear’s Recommendations
There are a lot of ways to speed up your LCP.
To make it easy, DebugBear gives us great next steps within their Recommendations section.
Let’s take a look at some examples of the recommendations and learn how to speed up this website’s LCP.
Recommendation 1: Initiate LCP Image Requests From The HTML Document
If the largest content element on your page is an image, the best practice is to ensure that the URL is directly contained in the initial HTML document. This will help it start loading as soon as possible.
However, this best practice is not always used, and sometimes it takes a long time before the browser discovers that it needs to download the main image.
In the example below, the largest content, which is an image, is added to the page using JavaScript. As a result, the browser needs to download and run a 200-kilobyte script before it discovers the image and starts downloading it.
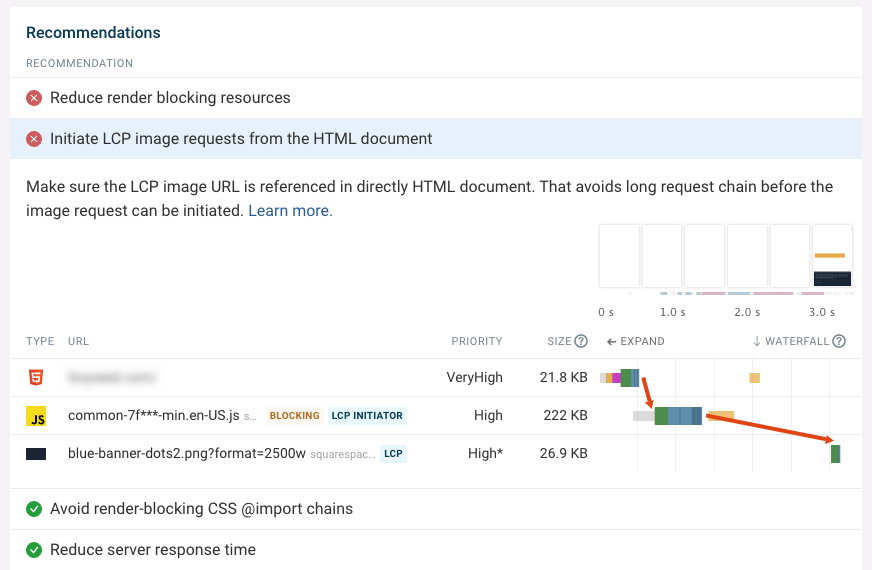 DebugBear screenshot showing a sequential request chain leading up to an image request, October 2022
How To Fix: Depending on the website there are two possible solutions.
Solution 1: If you’re using JavaScript to lazy load a large image, then optimize the image size and removed the lazy loading script or replace it with the modern loading=”lazy” attribute, which does not require JavaScript.
Solution 2: In other cases, server-side rendering would prevent having to download the JavaScript app before the page can render. However, this can sometimes be complex to implement.
Recommendation 2: Ensure LCP Images Are Loaded With High Priority
After loading the HTML code of a page, your visitors’ browsers may discover that, in addition to your main image, a large number of additional resources like stylesheets may need to be loaded.
The goal here is to make sure that your larger, main picture loads to fulfill the Largest Contentful Paint requirement by Google.
Other resources, like third-party analytics scripts, are not as important as your main image.
Additionally, most images referenced in your site’s HTML will be below the fold once the page has been rendered. Some may be hidden completely in a nested header navigation.
Because of this, browsers initially set the priority of all image requests to Low. Once the page has been rendered, the browser finds out which images are important and changes the priority. You can see an example of that in the screenshot below, as indicated by the asterisk in the priority column.
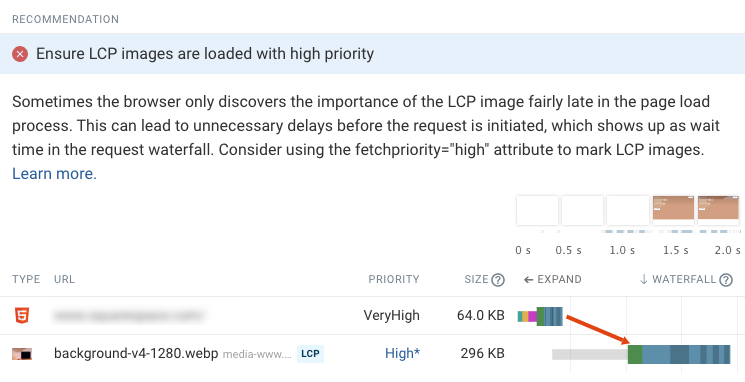 DebugBear screenshot showing an LCP image being loaded with low initial priority, October 2022
The waterfall shows that while the browser knew about the image early on, it didn’t start downloading it, as indicated by the gray bar.
How To Fix: To solve this you can use a new browser feature called priority hints. If you add the fetchpriority=”high” attribute to an img element, the browser will start loading the image right from the start.
Recommendation 3: Don’t Hide Page Content Using CSS
Sometimes you may look at a request waterfall and all render-blocking resources have loaded but still, no page content shows up. What’s going on?
A/B testing tools often hide page content until test variations have been applied to content elements on the page. In those cases, the browser has rendered the page but all content is transparent.
What can you do if you can’t remove the A/B testing tool?
How To Fix: Check if you can configure the tool to only hide content that is affected by A/B tests. Alternatively, you can check if there’s a way to make the A/B testing tool load more quickly.
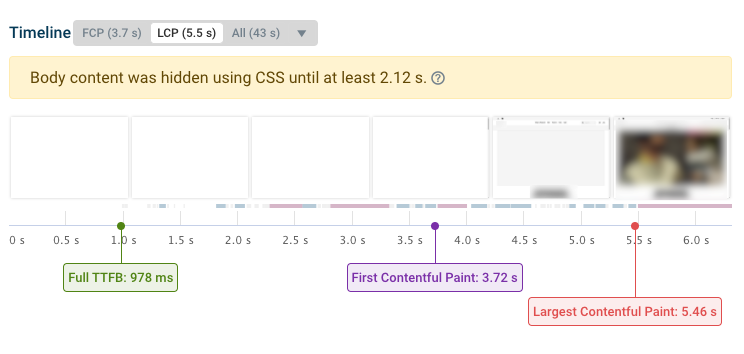 DebugBear screenshot showing a rendering filmstrip where content is hidden by an A/B testing tool, October 2022
Monitor Your Site Speed With DebugBear
Want to continuously test your website? Try our paid monitoring tool with a free 14-day trial.
That way, you can check if your performance optimizations are working and get alerted to any performance regressions on your site.
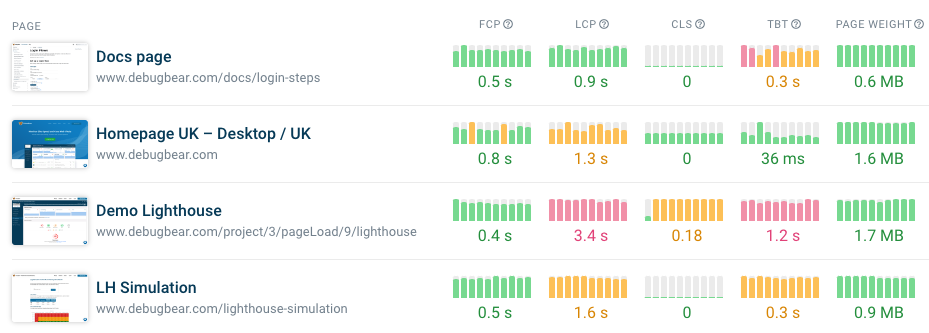 Screenshot showing site speed trends for a website in DebugBear, October 2022
The opinions expressed in this article are the sponsor's own.