Imagine spending hours creating a Google Sheet to share with your team, only to find that a team member accidentally deleted an important column, row, cell, or, even worse — an entire sheet.

![→ Access Now: Google Sheets Templates [Free Kit]](https://no-cache.hubspot.com/cta/default/53/e7cd3f82-cab9-4017-b019-ee3fc550e0b5.png)
That can be frustrating. However, it's entirely preventable if you lock cells in Google Sheets.
As it turns out, with just a few clicks of a mouse, you can lock cells and entire sheets in Google Sheets — meaning, you and your team can work on the same sheet without hindering the next person from completing their assigned tasks.
In this post, we’ll go over how to lock and unlock cells in Google Sheets.
-1.webp)
10 Free Google Sheets Templates
10 Google Sheets templates for your marketing, sales, and customer service needs.
- Budget templates
- Goal-setting templates
- SEO and email templates
- Sales KPI templates
Table of Contents
- The Benefits of Locking Cells in Google Sheets
- How to Lock Specific Cells in Google Sheets
- How to Lock Cells and Give Editing Permissions to Select Users
- How to Lock an Entire Sheet
- How to Show a Warning but Allow Editing of a Locked Cell
- How to Unlock Cells
The Benefits of Locking Cells in Google Sheets
Google Sheets allows users to lock cells from editing, which means you can protect your Sheet from any potential accidents, including editing and deletion.
You can also protect important data and calculations, so you can rest easy knowing the formulas in your Sheet are correct and accurate.
The ability to lock cells in Google Sheets comes with a variety of benefits.
Not only can you lock cells from editing, but you can also control which team members can edit your document — right down to the very cells those team members are allowed to manipulate.
This is extremely helpful if multiple team members are working on the same Sheet at once. You can also copy permissions from other sheets, if you have locked cells in other Sheets.
Let’s take a look at the steps to lock cells in Google Sheets.
How to Lock Specific Cells in Google Sheets
Locking specific cells in Google Sheets is a simple task. Here’s how to do it:
1. Right-click on the cell you want to lock.
After opening a new Google Sheet (or a Sheet you have already been working in), right-click on the cell or cells you want to lock.
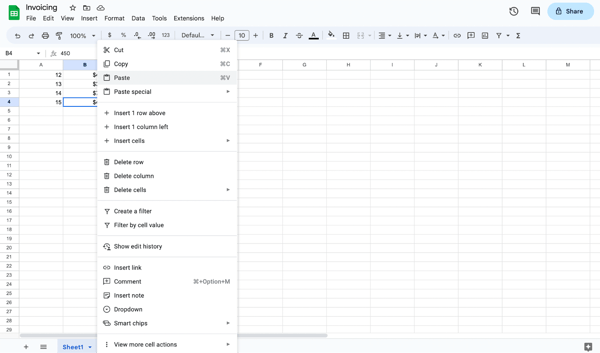
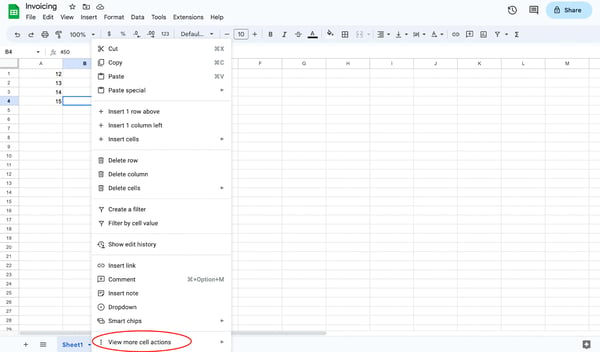
2. Hover over “View more cell actions.”
This option is listed at the bottom of the dropdown menu.
Depending on where your cells are located in the Sheet, you may need to scroll down until you see it. When you see it, hover over the “View more cell actions” to open up another menu.
3. Select “Protect range.”
The next menu will give you several more cell actions. Look for the action labeled “Protect range.” Choose “Protect range” to begin assigning cells to a locked status.
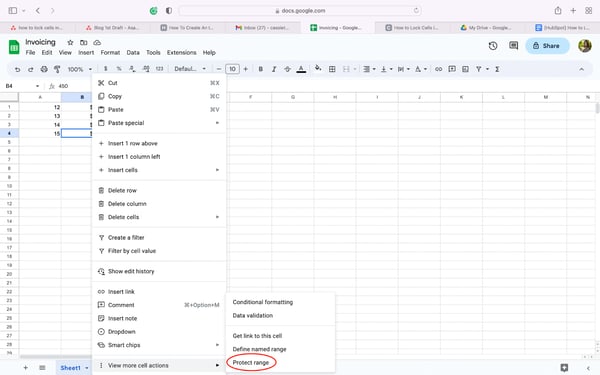
Alternatively, you can perform the same task by clicking on the Data tab and choosing “Protect sheets and ranges.”
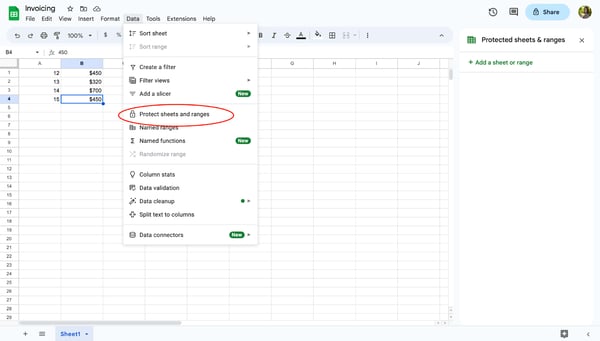
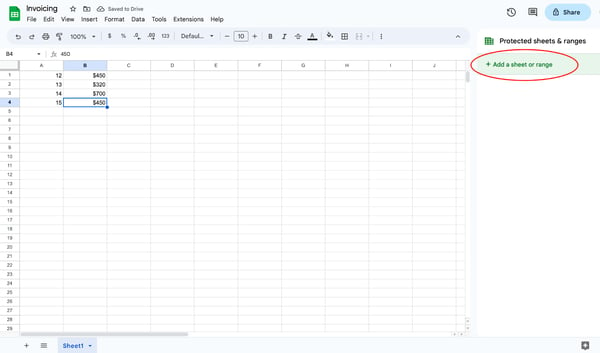
4. Choose “Add a sheet or range” from the side panel.
After clicking “Protect range” from the dropdown menu or “Protect sheets and ranges” from the Data tab, you will notice the open side panel on the right of your screen. Click on “Add a sheet or range.”
5. Choose which cells to lock.
Next, decide which cells to lock from editing. If you click the cell you want to lock, that cell’s information will be referenced in the range section. If you need to lock a range of cells, enter the range into the field.
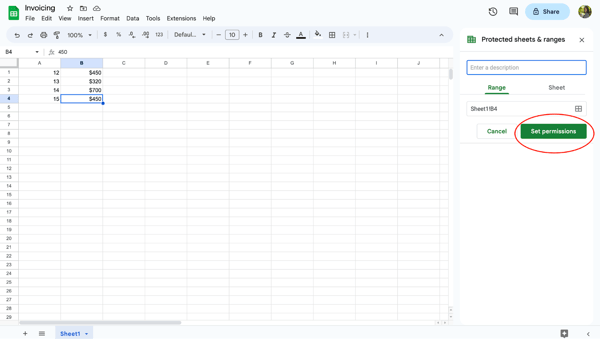
6. Select “Set permissions.”
Select “Set permissions” to choose who can edit the selected cells. If you’re the only person allowed to edit the cell, make sure you choose “only you.”
You can also copy permissions from other sheets, if you have locked cells in other Sheets.
7. Select “Done.”
Once you’re finished locking cells from editing, click “Done” to save your preferences. Now, those cells are locked from editing until you unlock them and change the settings.

How to Lock Cells and Give Editing Permission to Select Users
If you and your team are working in a Google Sheet, consider giving editing permissions to select users. This will help you assign tasks and better manage your project and keep others from accidentally deleting important work.
To lock cells and give editing permission to select users, follow these steps.
1. Right-click the selected cells.
Choose the cell or cells you would like to restrict. Then, right-click to open up the dropdown menu.
2. Hover “View more cell actions.”
Scroll or look to the bottom of the dropdown menu and hover over “View more cell actions.” This will open another menu on your screen.
3. Select “Protect range.”
To change a cell’s editing status, choose “Protect range.” This action will open a side panel menu.
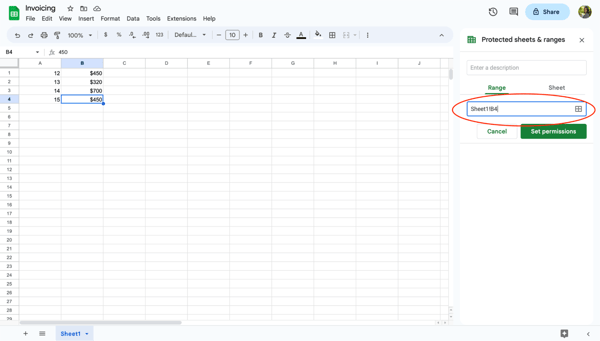
4. Click “Add a sheet or range” from the side panel.
In the side panel, click “Add a sheet or range.” Clicking this button will allow you to enter which cells or sheets to lock.
5. Choose which cells to lock.
Determine which cells your team member needs to perform their assigned task. Then, enter the range of cells into the box.

6. Select “Set permissions.”
Once you’ve entered the desired cells in the box, you’ll need to set editing restrictions. To restrict access to the range of cells, click “Set permissions.”
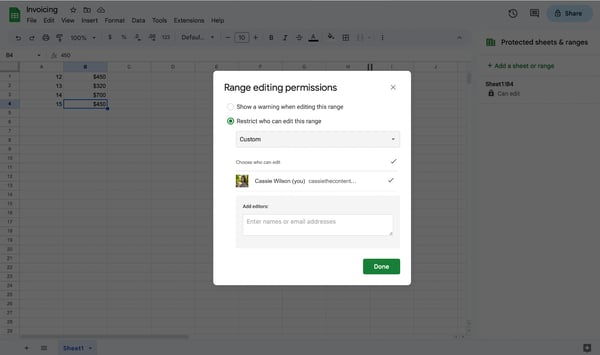
7. Choose “Custom.”
From this screen, you have the option to decide who has permission to edit the range of cells. To add a team member or multiple team members, click “Custom.”
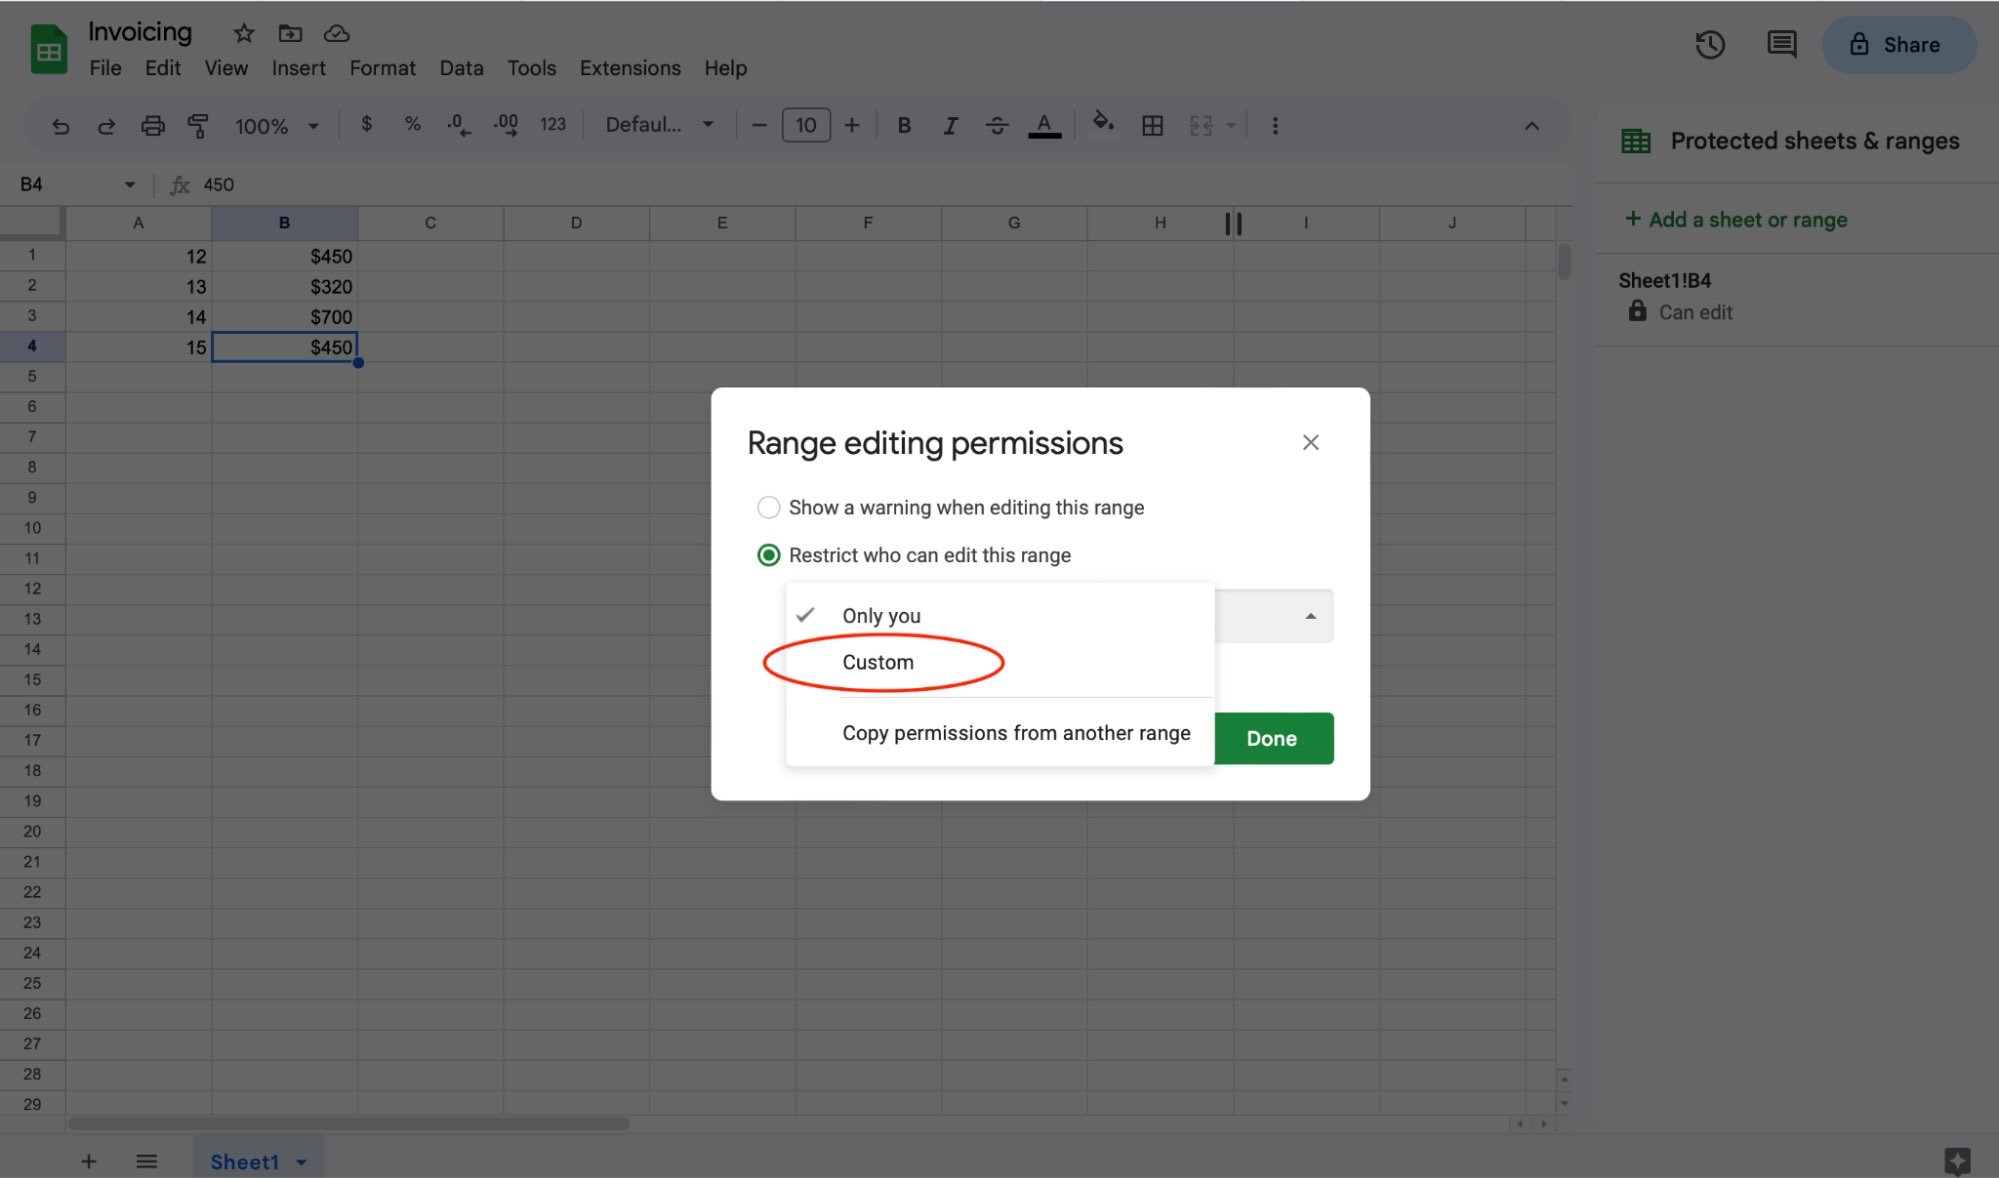
8. Assign editors to cells.
Now, you can decide who needs editing access to the range of cells you have specified. Enter the email addresses of your team members to assign them as editors of the cells. This will give them editing access to designated cells within the sheet.
Be sure to click “Done” to save the range editing permissions.
How to Lock an Entire Sheet
There may be times you will need to lock an entire sheet from editing. Thankfully, this is a simple process.
To lock an entire sheet, you can right-click on any cell within the document to open the dropdown menu. You’ll take the same steps to lock an entire sheet as you did with locking just one cell.
Here’s how to do it:
10 Free Google Sheets Templates
10 Google Sheets templates for your marketing, sales, and customer service needs.
- Budget templates
- Goal-setting templates
- SEO and email templates
- Sales KPI templates
1. Right-click on any cell.
Right-click on any cell in your Google Sheet to open a drop-down menu. To lock an entire sheet, it does not matter which cell you use to do this.
2. Hover over “View more cell actions.”
Choose the “View more cell actions” option at the bottom of the dropdown menu. You do not need to click. Just hover over it to open another menu.
3. Select “Protect range.”
Click “Protect range” to open the permissions side panel. Alternatively, you can reach the “Protected sheets and ranges” side panel by clicking on the Data tab and selecting “Protect sheets and ranges.”
4. Choose “Add a sheet or range” from the side panel.
Click “Add a sheet or range” to begin locking an entire sheet.
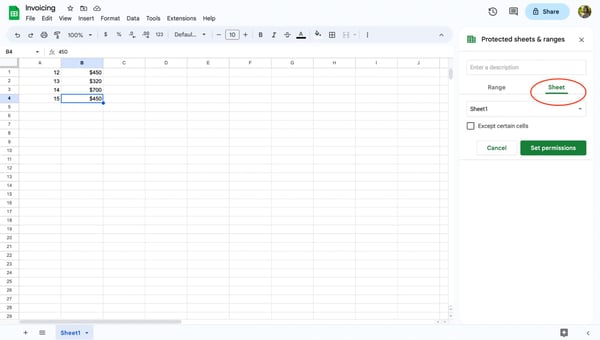
5. Click on “Sheet.”
Click on the “Sheet” button to lock an entire sheet. Once you're in the Sheet tab, select which Sheet you would like to lock.
ou have the option to exclude certain cells from being locked. If you need certain cells open for editing, click the box for “Except certain cells” and specify the range.

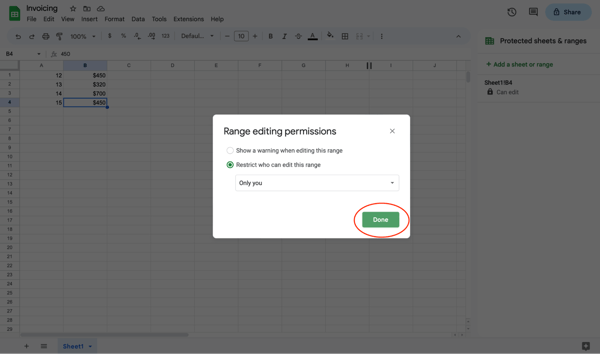
6. Select “Set permissions.”
Before you can lock your Sheet, you need to set editing permissions. Select “Set permissions” to choose who can edit the locked Sheet. If you are the only person allowed to edit the sheet, make sure you choose “Only you.”
Once you’ve determined who has editing permissions for your Sheet, either just you or members of your team, be sure to hit “Done” to save the permissions. Now your Sheet is locked and cannot be edited without permission.
How to Show a Warning but Allow Editing of Locked Cells
If you’re working on a document simultaneously with team members and you don’t want your cells to be modified, you can allow users to receive a warning before accepting their edits.
To show a warning, follow these steps:
1. Right-click on the cells you want to lock.
In your Google Sheet, right-click on the cells you want to lock. You can set a warning for an entire Sheet by following this process as well.
2. Hover over “View more cell actions.”
Scroll to the bottom of the menu and hover over “View more cell actions.”
3. Select “Protect range.”
To set an editing warning on certain cells or your Sheet, click “Protect range” to assign cells or a Sheet to a warning status.
4. Choose “Add a sheet or range” from the side panel.
On the right of your screen, you will see an open side panel menu. Click “Add a sheet or range.”
5. Choose which cells or sheet to set an editing warning.
You can set an editing warning for a range of cells or an entire sheet. In the side panel, determine which cells or sheets need a warning and make sure the information referenced in the box matches your desired cells or sheet.
6. Select “Set permissions.”
After you have verified which cells or sheets should have an editing warning, click “Set permissions” to go to the editing preference screen.
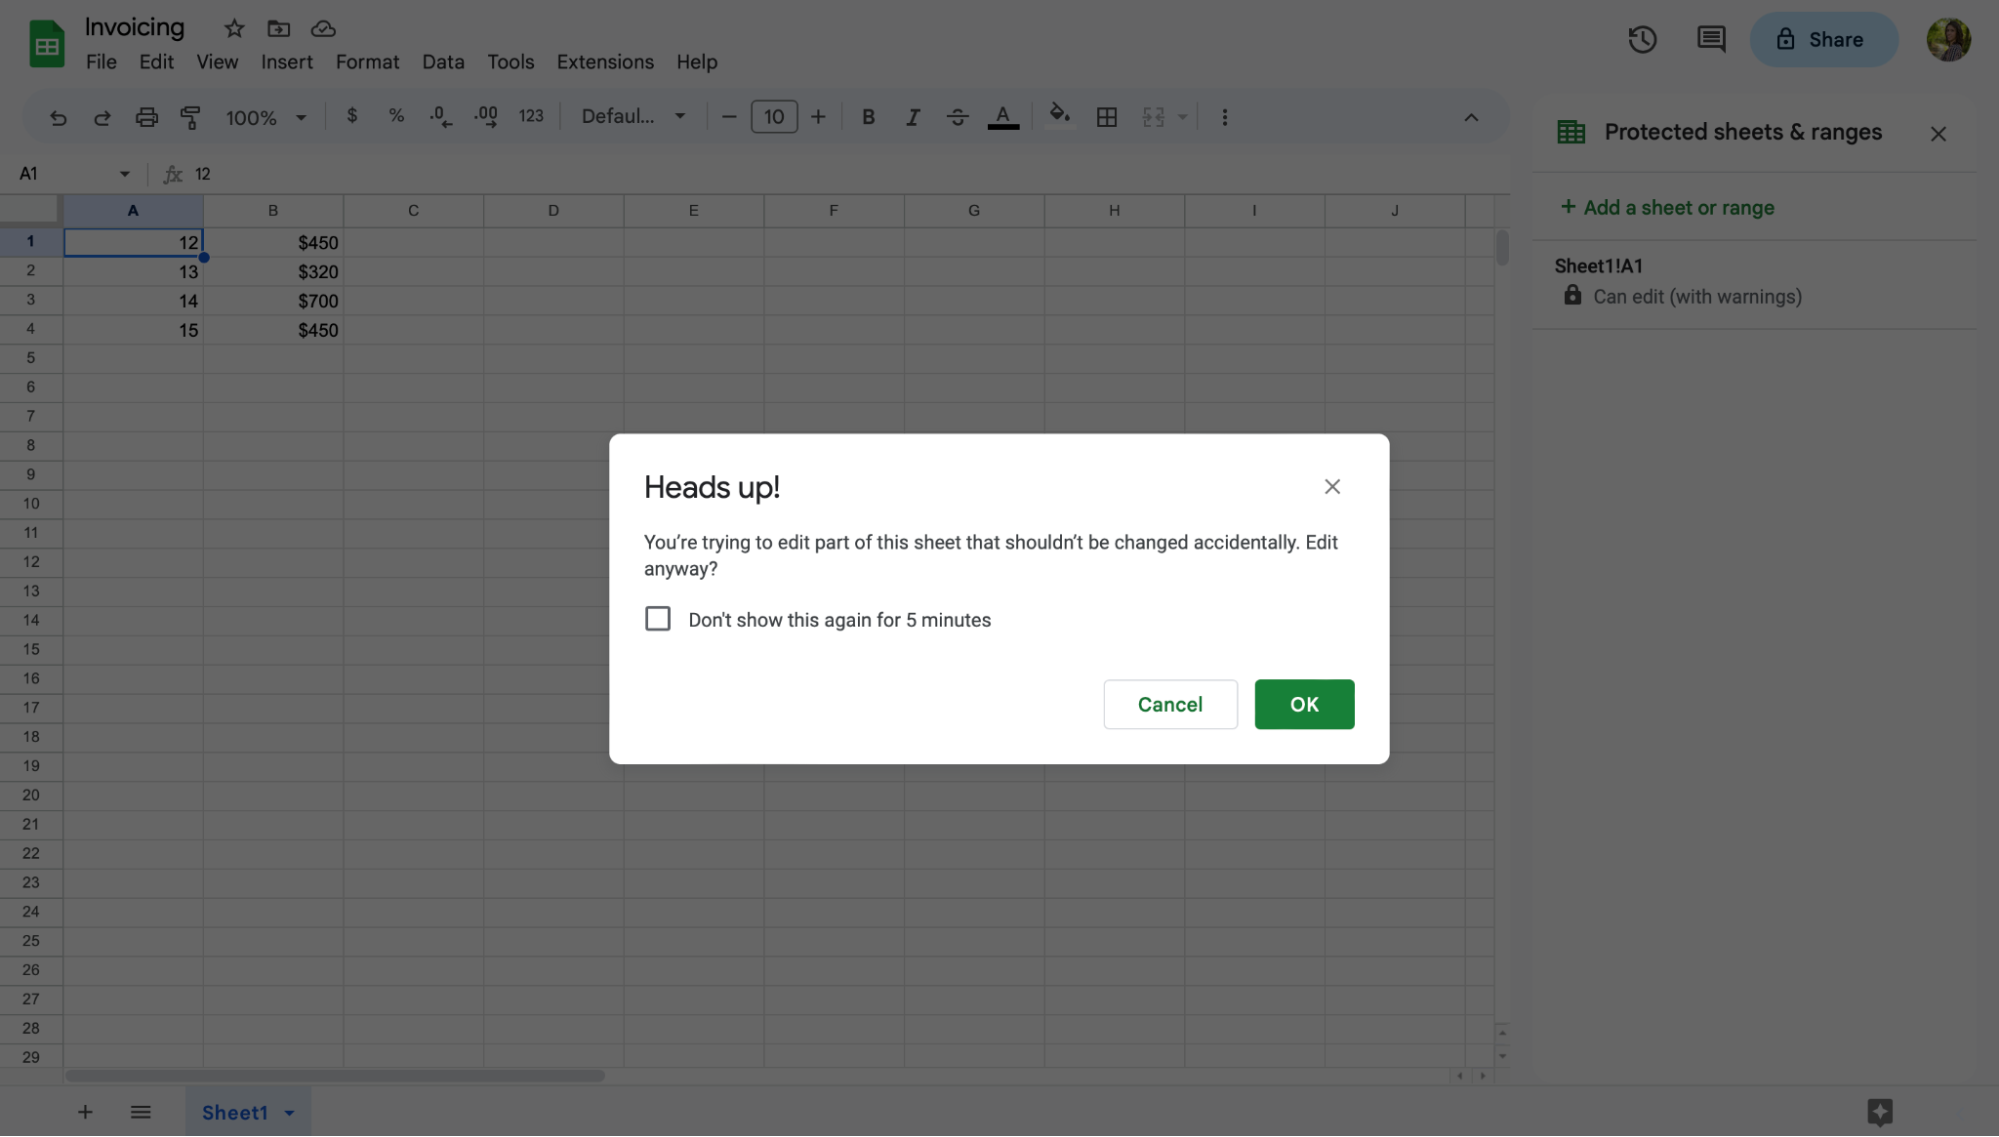
7. Choose “Show a warning when editing this range.”
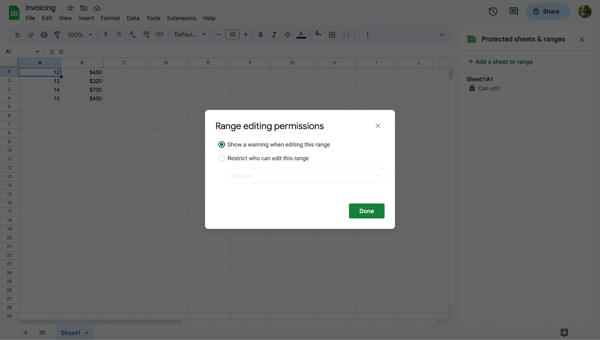
Select “Show a warning when editing this range,” then hit “Done” to save your editing permissions.
If a user tries to make changes in the semi-locked cell or Sheet, they will receive a warning message as a heads-up. Users must either click “Cancel” or “Ok” to make changes or revert to the original document.
How to Unlock Cells
Locking a cell or a Sheet is extremely helpful in maintaining the integrity of your data. But, there will be times when you will need to unlock a cell to update or change the information within it.
Now that you understand how to lock cells, let’s take a look at how to unlock them.
1. Right-click on the cells you want to unlock.
In your Google Sheet, right-click on the cell you need to unlock. This action opens a dropdown menu.
2. Hover over “View more cell actions.”
Look for the “View more cell actions” option in the drop-down menu. This option is located at the bottom of the dropdown menu. When you find it, hover your mouse over the action.
3. Select “Protect range.”
Like locking a cell, you will still need to click on the “Protect range” option. This will open a side panel menu where you can choose to unlock the cell.
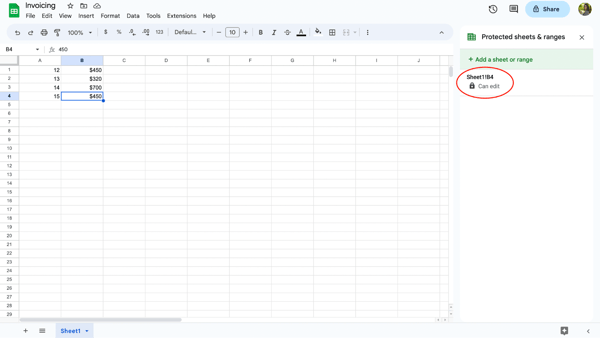
4. Click on the locked cell.
In the side panel menu, you will see a list of locked cells within your Sheet. Click on the cell or cell range that you wish to unlock.
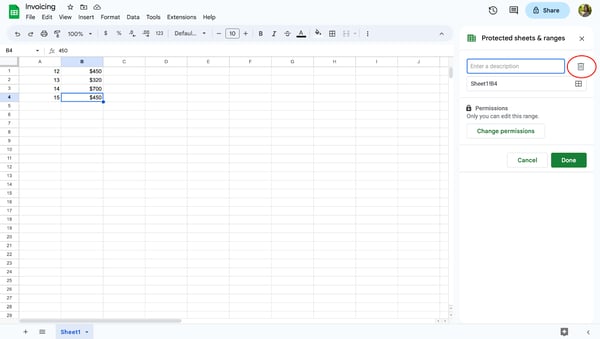
5. Click the trashcan icon.
Next, click on the trashcan icon to the side of the description box.
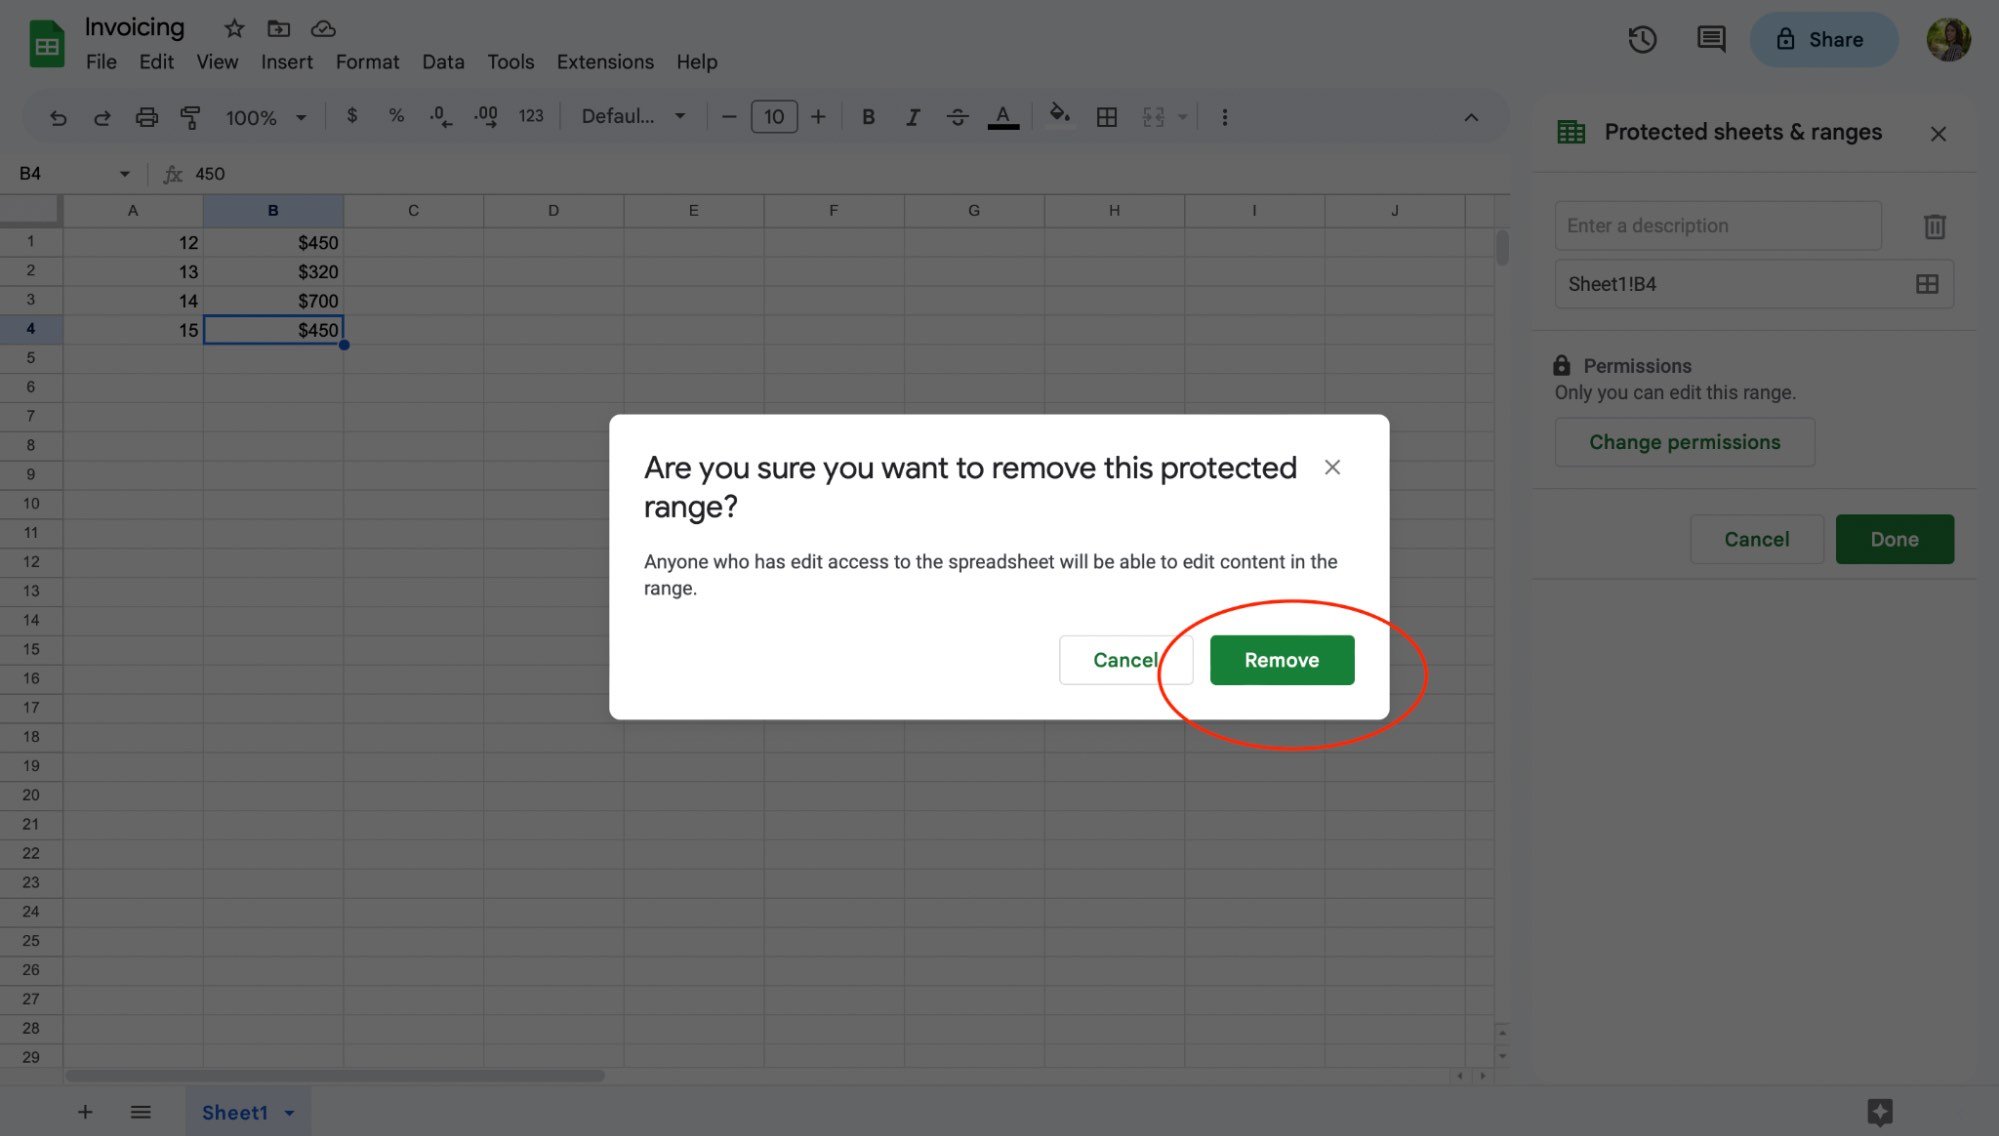
6. Select “Remove.”
A warning screen will pop up asking if you want to remove the protected range. If you are sure you want to unlock the cell, click the “Remove” button.
Once you click the button, your cell is free to be edited by anyone with editing permission for the document.
Locking Cells in Google Sheets
And there you have it! Be sure to take some time to set editing preferences and assign certain cells or sheets to your team.
10 Free Google Sheets Templates
10 Google Sheets templates for your marketing, sales, and customer service needs.
- Budget templates
- Goal-setting templates
- SEO and email templates
- Sales KPI templates
Once you’ve done that, you and your team can confidently work on the same Google Sheet without worrying someone will accidentally edit or delete important information.


![How to Highlight Duplicates in Google Sheets [Step-by-Step]](https://blog.hubspot.com/hubfs/highlight-duplicates-google-sheets_7.webp)
![How to Make a Histogram on Google Sheets [5 Steps]](https://blog.hubspot.com/hubfs/how%20to%20make%20a%20histogram%20on%20google%20sheets.jpg)